Ham radio remote operations latency measurements

Introduction

There are ham operations that a remote operator needs to carry out that do not require real-time speed. Examples are switching antennas, adjusting radio parameters, fiddling with amplifier settings, and others. The one action that is most time-critical is when the operator responds to an on-the-air signal. If that does not happen quickly, time is lost by repeats, others getting to make that QSO first, or the QSO is not happening at all. That is theoretically true for both local and remote operations, but most critical for success while operating contests remotely.

I have participated in contests for a long time. I am just getting started with remote contesting and noticed a subjective increase in doubling. It happens more often that I am trying to respond to a caller and we both transmit at the same time. It seems I waited too long. The reason is obvious: there is some delay in my setup that puts my signal on the air later and the other station has already started transmitting again.

When breaking down this delay further, it seems the 2 most crucial components that affect this overall are:

  • The time of the RX audio to reach the control operator’s ears, and
  • The time of the control operator’s action (keyboard stroke) to key the transmitter.

I will call the components “RX audio latency” and “keyboard latency”.

My goal is to the measure the delay of each properly and compare alternative solutions.

Receive audio latency test setup

In these tests, I am comparing two receivers. To establish a baseline, I first use 2 local receivers and later I use one local and one remote receiver.

Both receivers are tuned into the same strong station. The ear will already confirm that there is a time difference of the received signals. It is easier to detect with strong stations that transmit at a certain interval. For this purpose, I used WWV.

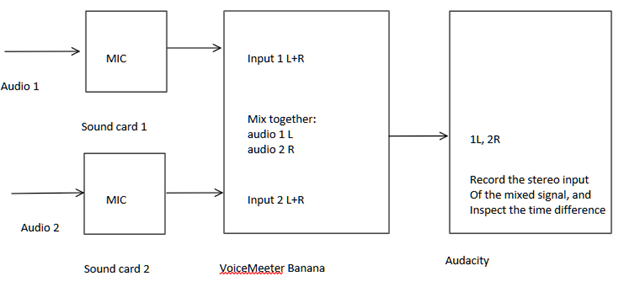
Figure 1 RX audio latency test setup

Both receivers’ audio (one direct and one coming from the remote) will be fed into its own sound card microphone jack. Both sound cards are the same. As we are only interested in the difference of the latency, using similar sound cards and measuring the delay between both audio channels will be sufficient. The right picture shows how to connect if you have the 2 audio signals coming from local hardware. I used this setup when both receivers are sitting on the same work bench. There are other scenarios to measure, where the audio arrives from the remote location. In that case I used a 3.5mm jumper cable to feed the remote audio into the microphone input (I did not find a better solution. Since the audio in this case comes from the remote, I must convert it from a playback to a recording device)

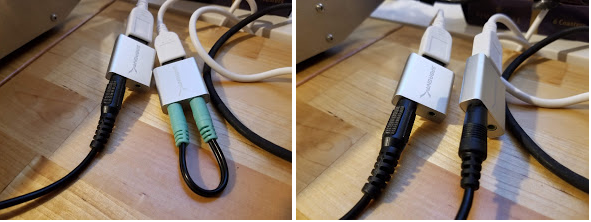
Figure 2 Sound card connections

It’s easy to record a stereo signal and measure the delay between left and right channels with the open-source tool Audacity. In order to get the signals mixed this way I choose Voicemeeter Banana.

In Audacity, chose the output of the B1 channel of VoiceMeeter as the input, and chose stereo. Then record the input and when you see a good signal that can be measured, stop the recording (1, 2). Use the mouse to drag a selection from the signal’s start in the left channel to the start in the right channel (3). The program then shows the time of the interval, which is the latency we want to measure (4). In the example screen shot it shows 96ms, which is the delay of the audio the Flex 6600M adds with medium-sharp filter settings.
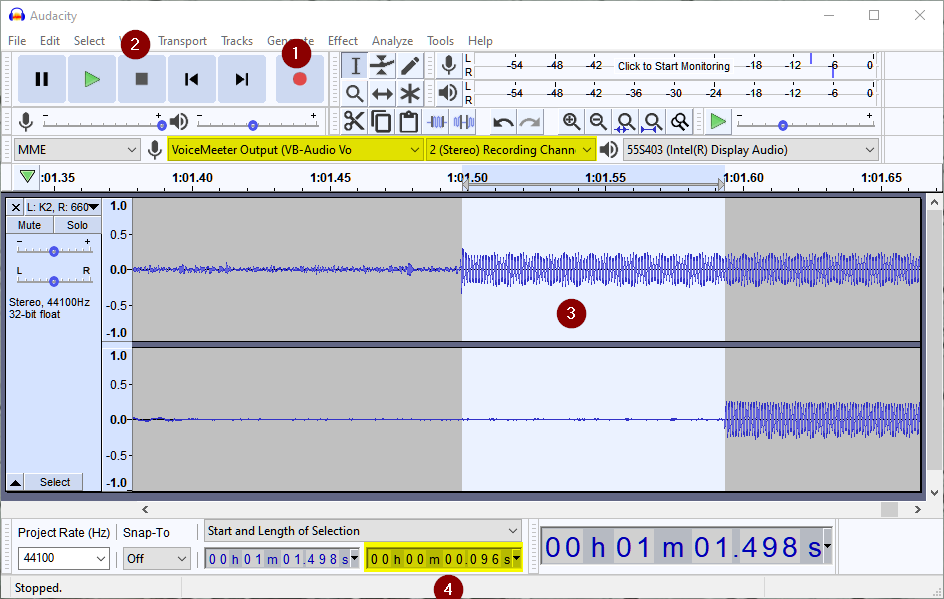
Figure 3 Audacity

RX audio latency measurements

The total latency is made up by the parts illustrated in this next figure.

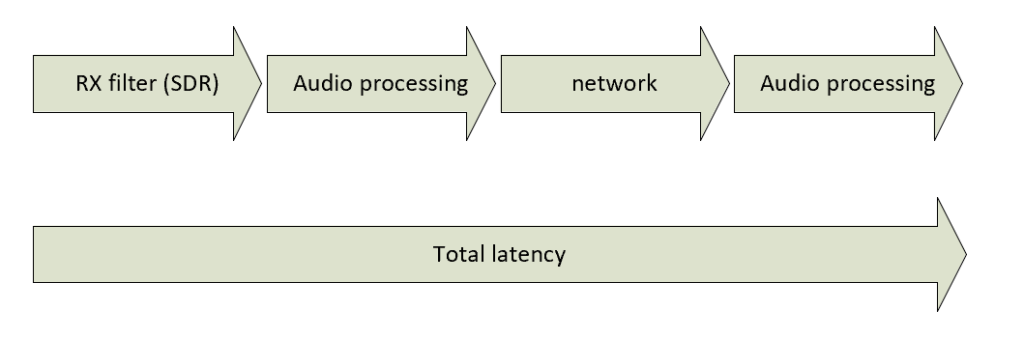
Figure 4 Latency components

For any remote operation we will have audio processing on either side and network latency to deal with. Network latency can be measured and estimated easily.

Even though my initial measurements included network latency, I have taken it out of the results, as it will be different for everyone and can easily be measured and added.

I have also removed the latency because of SDR filtering. Its easily to measure, without needing a remote setup.

The numbers below include the audio processing on both sides of the link.

Audio 1 sourceAudio 2 sourceAudio delay
Local RX, speaker output jackRemote RX, speaker output jack, audio via murmur/mumble (see Appendix)165ms
SameRemote RX, speaker output jack, audio via RemAud server/client (see Appendix)98ms
SameRemote RX, speaker output jack, RemoteRig (untested, numbers provided by vendor)80ms

For my internet link with 45ms of latency the total latency is between 210 and 125ms for any software or hardware solution. That’s without any SDR filters enabled.

In order to estimate the latency you would experience, add your internet latency and SDR filter latency (if you have any) to the numbers above.

Since I have a Flexradio 6600M, here are a few specific measurements for the Flex using SmartSDR.

Audio 1 sourceAudio 2 sourceAudio delay
Local RX, speaker output jackLocal Flex 6600M, speaker output jack, lowest filter setting48ms
SameLocal Flex 6600M, speaker output jack, 2nd filter setting64ms
SameLocal Flex 6600M, speaker output jack, 3rd filter setting96ms
SameLocal Flex 6600M, speaker output jack, 4th filter setting160ms
SameLocal Flex 6600M, SmartSDR with PC Audio, 3rd filter setting, LAN (< 1ms latency)572ms

SmartSDR with PCAudio seems to add substantial latency into the audio chain. However, it may depend on the use case if it is an issue or not. Personally, I like the simplicity of using SmartSDR/PC Audio for casual operations. I avoid using it when I need fast-paced exchanges, as in contests.

Notes:

  • Any software tools used here add latency on their own. I have not tested the audio latency of VoiceMeeter Banana, the sound cards or Audacity. However, since I route both channels through the same components, the added latency will be in both channel’s latency. Measuring the difference of both channels spectrum should cancel them all out.
  • Window’s audio chain is known to have latency. The software solutions tested incur this on both sides.
  • RemAud supports stereo, murmur/mumble does not. That makes mumble unusable for remote SO2R operation.
  • A RemoteRig is not physically available to test. RemoteRig is advertised to be designed for low latency and may not have the overhead of the Windows operating system. The information gathered from RemoteRig support is this:

If you use the default setting packet size = 20ms and jitterbuffer delay = 3, the latency will be

20ms to sample the first packet
+45ms  your internet latency
+3 x 20= 60 ms buffering
= 125ms

Keyboard latency

The question I tried to answer was: How much is added to the delay because of the operator is not close to the radio and therefore any keyboard action will take some time to reach the radio.

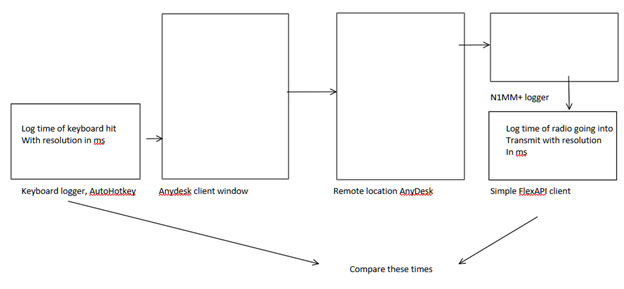
Figure 4 keyboard latency test setup

I put Meinberg NTP time sync software onto both computers. I also used https://time.is/ to verify that the time was close to exact. Then I added a small AutoHotKey script on the users PC that logs the timestamp of when the Enter key is hit.

Enter::

{          

    OutputDebug, key was hit at %A_Min%.%A_Sec%.%A_MSec%

    Send {Enter}

    return

}

Next, I wrote a small FlexAPI-based Windows Forms app that shows the exact time when the FlexRadio is being put into transmit (Radio.MOX property).

Keyboard latency measurement (Anydesk, remote N1MM+)

When I compared these timings, the difference was around 50 – 60ms. Considering a 45ms network latency (and a 0ms setting for PTT lead time in N1MM+), that is a very good result. It turns out that AnyDesk has implemented this very well.

This result is so good, that I did not measure how long it would take with N1MM+ close to the control operator position, but I assume it would be similar.

Appendix

VoiceMeter Banana setup

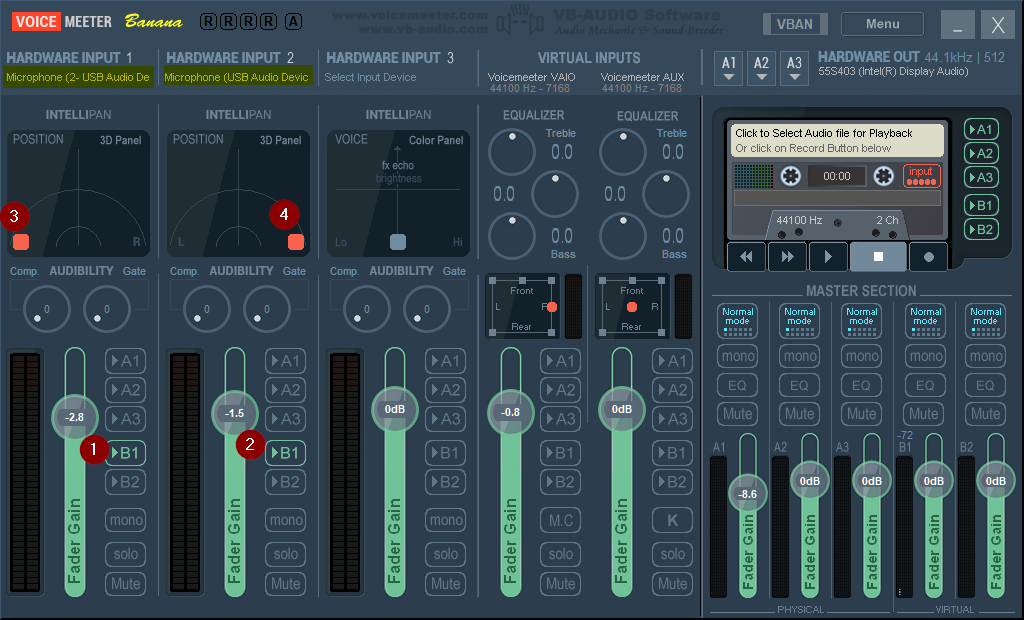
Figure 5 VoiceMeeter Banana

In the screen shot you can see that my inputs 1 and 2 are coming from the 2 sound cards. In order to route the inputs to the proper output chose B1 and B2 for both inputs (1, 2). To get radio 1’s left channel and radio 2’s right channels mixed into the output, I adjusted the balance of the inputs appropriately (3, 4).

Optimal murmur/mumble setup

For setup instructions, follow: https://www.youtube.com/watch?v=DBfyQRvOmag

RemAud

Written by Bernd, DF3CB, can be found here https://www.df3cb.com/remaud/

My settings during the measurements were 20ms buffer, stereo.

Also, I opted for not using a VPN, but to use port forwarding for the one port that murmur exposes. VPNs will add latency and can also complicate LAN IP ranges.

Special thanks for Michael, VA3MW and Steve, N2IC for valuable input.

N1MM+ – DXLab integration for DXers

As a casual contester, I have N1MM+ setup and optimized for contesting. But I find that I also like using N1MM+ and its hardware setup for non-contesting operations as well. Unfortunately, N1MM+ lacks many of the necessary non-contesting features found in general purpose logging programs.

For the past few years the developers at DXLab and N1MM+ have collaborated to support a logging interface between N1MM+ and the DXLab DXKeeper. The auxiliary program, called N1MM-DXKeeper Gateway, inserts records into the DXLab DXKeeper database after they have been logged in N1MM+. This gateway works well and allows me to take advantage of the feature-rich software suite provided by DXLab.

During last CQ WW SSB contest, I had a few teenagers in my shack to get on the air. We kept looking up countries we worked on an online map to find out which contact was the farthest, whether we could find any photos about the remote stations, and other interesting information.  This is when I got the idea for improving the existing N1MM-DXKeeper Gateway. Wouldn’t it be very helpful and educational if all the information we could get about a call automatically pops up during the QSO?  I also think this would be a very effective feature to show on a FieldDay GOTA station.

A few emails with the programmer of DXLab, David, AA6YQ and the plan was made to get this in both DXLab and N1MM+.

There is now a new version of the gateway that provides this functionality of looking up a callsign (in addition to the previous function of logging QSOs). It can be found here.

In N1MM+, of version 7336 or later,  this feature can be enabled in the Configurer dialog.

N1MM+ configuration

With the new gateway launched as part of DXLab’s launcher (or by any other means), the highlighted pieces of information are all automatically looked up and populated as soon as the user hits the SPACEBAR or TAB key in the N1MM+’s entry window.  The most amazing feature to demo to others (think: new hams!) is the “Fly to selected location” feature in DXView/Google Earth.

New gateway

automatically looked up information

As a side note, this feature is built generally into N1MM+ via UDP packets. Other logging programs are welcome to integrate this as well.

There should not be a noticeable impact on performance to enable this as the implementation is not blocking the program flow (parallel threads). If you do see performance issues, it is possible that this is caused by your virus scanner. Make sure you exclude the program and user directories of N1MM+, N1MMDXKeeperGateway and DxLab (CWSkimmer, RBN Aggregator, etc.) from your virus scanner. I have experienced serious performance issues before I did this. I believe the patterns of DX cluster and UDP data traffic from ham programs look very suspicious to these scanners.

I want to thank David, AA6YQ, and Larry, K8UT, for their help in designing and testing this feature.

Working SO2R with Flexradio’s 6600M, B26 RF2K+ amplifier kit, 4O3A’s 1 AMP 2 Radio switch and N1MM+ contest logger

I am proud owner of a Flex 6600M and a RF2K+ kit amplifier. Both work really well together.

Flexradio 6600M

RF2K+ amplifier

The radio is built with SO2R in mind (2 ANT outputs, receive filters for contesting bands). The amplifier came in form of a kit and produces legal limit of power on all bands below 6 m. Putting the amp together was easy and took me about 1 day. I like the fact that the amp can be tucked away and can be fully remote controlled from any computer device on the network.

After working for a few days with the new toys, I realized that I could use the amp for both slices by swapping ANT1 and ANT2 on the radio and switching my 6 x 2 remote antenna switch appropriately. This worked great, however, was cumbersome to do during a contest. Time-consuming enough that it pretty much prevented a semi-competitive contest entrance. For SO2R and in High Power category, you want to run with high power and also do S&P with high power. Or even run on two bands with high power. My next question was: Do I really need 2 amps for this?

Turns out, the answer is NO. I found this neat antenna switch called “1 AMP 2 radio switch” and made by 4O3A. That allows not only to share one antenna with 2 radios, but I can share one amplifier with 2 radios/VFOs.

1 AMP 2 radio switch by 4O3A

Diagram from 4O3A’s website

For more details, read on below.

And by the way, the should be doable with any other CAT controllable radios and amplifiers. No affiliation to any manufacturer referenced in this blog.

Understanding the equipment better

Before putting this all together, I had to learn and understand more about PTT, PTT lead times and how it relates to all three pieces of equipment at play. Here are a few of my notes:

RF2K+ kit

  • If the amp has to switch band relays (transmission about to occur on a different band), it takes about 15 ms.
  • PTT lead time before RF is not needed by the amplifier, its likely more needed by transceivers and antenna switches. A “good-citizen” value would be maybe 10ms.

The amplifier has multiple rig control modes. I have played with CAT, UDP and Universal.

Universal rig control mode:

  • Basically, this is without any rig control and have the amplifier figure everything out.
  • In this mode, the amp runs a comprehensive RF sensing routine, that takes up to 15 ms.
  • With a PTT lead time of 10 ms it would take <= 40 ms (10 + 15 + 15) till High power goes out, and <= 30 ms would be lost of the signal.

UDP/CAT:

  • The amplifier can receive UDP packets that tell it what frequency. This is very similar to a simple Kenwood-style CAT protocol that can also be used.
  • If the amp is in CAT or UDP mode, it does a short RF sensing routine, that takes about 3-5 ms.
  • With a PTT lead time of 10 ms it would take 13-15 ms (10 + 3-5) till High power goes out, and 3-5 ms would be lost of the signal.

1 AMP 2 Radio switch

  • This is a fairly simple device. The main consideration is how long the relays take to switch. I am hoping 10 ms is enough.

Experimenting

Rig control mode
My initial thought was to use CAT. Hooking this all up was a breeze with a null modem cable between 6600M and the RF2K+. The 6600M provides a way to use CAT control for the slice with TX focus. That’s exactly what I needed and the switching works correctly, but unfortunately not 100% of the time…

Second test was with UDP. UDP is a little harder, as N1MM+ provides UDP packets for both EntryWindows every couple of seconds. So, I had to build a small translator (in N1MM+ software) to only send the UDP packet for the TX active slice. That also worked, and similarly as the CAT control. Most of the time only…

The last option was to use Universal mode. Have no rig control and just have the amp do the work. Even though I thought this would be a brute-force method and not advisable, it turned out to be very reliable. The amp does not miss a beat during dueling CQ and also during breaking into a running CQ on radio 1 by hitting F4 (my call) on the other radio. Reliability is a must, so I considered going with this approach.

But what about the loss of the signal during the leading few milliseconds? With the help of over the air tests with N2IC it turned out that it is actually not a big deal. I sent leading Vs (starts with a dit) at 36 word per minute. The slight cut off of the signal is very small and almost not noticeable on the receiving end.

CW at 36 wpm with RF sensing and band switch in Universal mode

So, why is it not as reliable with CAT or UDP? I can only guess. I think it may be possible that the amplifier needs more time to process these control signals. I am fairly certain that I was able to send the UDP messages very fast, so it may be either network related or slowness of the amp. At this point I am not sure, but will contact the maker of the amp.

Temperature
What does it do to the amplifier’s temperature, if used in SO2R mode in duelling CQ mode? Well, it gets a little hotter. Different bands need different amount of bias current and therefore produce different amount of temperatures. I found, when 20 m band was involved and running 1.5 kW on both bands, I was sometimes reaching the maximum temperature that is programmed into the amp to switch from Operate to Standby, 72 degrees Celsius. I had the amplifier built in a way that favors the quietness of the fans (12 V fan drive). I have now reconfigured this and switched the fans to run in the 15 V mode, and have yet to reach the limit. I have to watch this a little bit in the future and will report back if I find any other issues. Off course the fans are now a little louder, but only under extremely high duty cycle. This should also help with doing digital modes or long rag chews in SSB on 20 m.

Cross-band RFI
Well, it turns out that I need to work on some RFI suppression. Apart from the receive filters built into the 6600M, I have no other band pass filters. Next project to tackle…

Summary

Here is a list of all settings that I found work best for my equipment.

N1MM+:

    • CAT for Slice A and B: PTT delay 10 ms
    • CAT for WinKey: PTT delay 10 ms
    • WinKey: Lead time: 1, Hang time: 2.00

6600M:

  • TX profile: TX delay 10 ms
  • TX profile slice A: RCA TX1: Enabled
  • TX profile slice B: RCA TX2: Enabled
  • Breakin: Enabled
  • CW sidetone: Off
  • CW delay: 0

RF2K+:

  • None. Just use Universal

Special thanks to DH3NAB (maker of the RF2K+), K8UT, N7HQ and N2IC for discussions, insights and over-the-air tests.

Station automation: starting and exiting multiple programs


Ham radio computers usually run a lot of different applications. This is like my desktop looks these days.  Yes, I use a 55 inch cheap 4k  TV as computer monitor.  I can only recommend this..


I got tired of launching them manually, and forgetting something. I used DXLab’s Launcher for a while. When I found some things that could not be done with it, I wrote my own batch scripts. Remember the old autoexec.bat? Exactly. 🙂

A little later, I wanted to launch a couple other programs in a different order.

Even later, I had a program that needed some time to finish launching, before the next program could be started.

Then it got too difficult to do this in batch scripting. I switched to Windows PowerShell. This turned out to be a good move.  Things got easier from then on.

Then I realized, I was even too lazy to log into Windows. Typing my password was the last thing that separated me from pushing the power button on the computer and having everything neatly open on the desktop.

Below I explain how to do set it up and use it. I share the tool, use it, share it, change it. So, if you are interested, read on. If you find bugs, let me know.

When you are all done, you will have at a minimum 2 shortcuts on your Windows desktop. One is to launch and one is to close all your applications (1 and 2 in the illustration below).

Note: I used to leave my computer on all the time because it was so much effort to launch everything. With the ideas presented here, it is so simple that I now turn the computer off almost every day. My shack is only 14 x 7 feet, so it heats up quickly if I keep a computer running all the time. And off course, it feels good to conserve energy.

Optional: How to automatically log into Windows

Do you want Windows automatically log you in when you turn it on? Its fully supported by Windows. Before you do it though, consider the security implications. Only do this with a personal computer and if you can trust the people that have access to your computer.

To set this up, simply follow the steps in this blog: Automatically log in to your Windows 10 PC.

List the programs to be launched

As a next step, you should take stock of everything you want to launch. Sometimes the order matters as well. The below file launches everything I need to operate my radio for rag-chewing or contesting (yours will look different, for sure. But you can get the idea how this works by inspecting mine). It launches everything I need to operate on my radio or run in a contest:

"C:\Program Files\FlexRadio Systems\SmartSDR v2.3.9\SmartSDR CAT\Cat.exe" /MIN
"C:\Program Files\FlexRadio Systems\SmartSDR v2.3.9\DAX\Dax.exe" /MIN
"C:\Program Files (x86)\UTC - World Clock\UTC - World Clock.exe"
;;;;;;;;;;"C:\DXLab\Launcher\DXLabLauncher.exe"
"C:\DXLab\Commander\CI-V Commander.exe"
"C:\DXLab\DXKeeper\DXKeeper.exe"
"C:\DXLab\DXView\DXView.exe"
"C:\Program Files (x86)\N1MM-DXKeeperGateway\N1MM_DXK_GW.exe"
"C:\Program Files (x86)\PABridge\PABridge.exe"
"C:\Program Files (x86)\Green Heron Engineering\GH Everyware Server\GH Everyware Server.exe"
"C:\Program Files (x86)\Green Heron Engineering\GH Everyware Client\GH Everyware Client.exe"
"C:\Program Files (x86)\Aggregator\Aggregator.exe" /MIN
"C:\Program Files (x86)\Elecraft\W2 Meter\W2.exe"
"C:\Program Files (x86)\PstRotatorAz\PstRotatorAz.exe"
"C:\Program Files (x86)\VOAProp\VOAProp.exe"
"C:\Program Files (x86)\wintelnetx_4_22\wintelnetx.exe" -start ini\MySkimmer_plus_W9PA_to_localhost23.ini
"C:\Program Files (x86)\FRStack\FRStack.exe"
"C:\Program Files (x86)\slice-master-6000-v0.10.5dUpdate\slice-master.exe" --window-minimized 1
"C:\Program Files\TightVNC\tvnviewer.exe" -optionsfile=C:\Users\andre\Documents\RF2K+VNCConnection.vnc
"C:\Program Files (x86)\N1MMLogger+\N1MMLogger.net.exe"

You may want to start with a file with just one or two programs registered. You can always add more when you got the script running.  Put each executable on one line in a text file. The full path must be in double quotes. Parameters are supported.  The order you put in the entries is the order the programs are going to be started.

Save the file at a convenient place. I suggest you put it somewhere in your Documents folder. I saved mine at C:\Users\andre\Documents\hamapps1.txt (%userprofile%\documents\hamapps1.txt for Windows Vista and later).

The script

Follow these steps to get the script:

  • Download the zipped up script from here AppAutomation
  • Unblock the zip file. Follow these steps: https://blogs.msdn.microsoft.com/delay/p/unblockingdownloadedfile/.
  • Now, unzip the file and save the AppAutomation.ps1 file right next to the text file you saved earlier.
  • In case you need to unblock the ps1 file too, do this now.

Create a shortcut to launch the applications

Right click your Windows desktop, and choose “Create a Shortcut” and type PowerShell.exe.

Hit the Next button. Then type in a good name. I called mine “StartApps”.  Then hit Finish.

Now we have a shortcut, but we need to hook it up with our script and text files.  So, open the shortcut (Right mouse click and choose Properties).

Update the Target by adding the text after the PowerShell.exe:

C:\Windows\System32\WindowsPowerShell\v1.0\powershell.exe -ExecutionPolicy Bypass %userprofile%\documents\AppAutomation.ps1 -launchOrExit $true -applicationsFilePath %userprofile%\documents\hamapps1.txt

In this shortcut, we see a couple of arguments:

  • -ExecutionPolicy is something we need for Powershell.
  • -launchOrExit tells it whether we launch ($true) or exit ($false)
  • -applicationsFilePath indicates where the text file is located.

Update the shortcut to run as Adminstrator.

Now, try it out. Double click the shortcut. Windows will pop up a UAC prompt, hit OK, and you should see your script run.

If you run it again, you will find that the script will only launch the programs that are not started yet. If all are still running, it will not do anything.

Create a shortcut to close the applications

Make a copy of your shortcut you just created.  Right click, Properties: In the Target box, change the parameter -launchOrExit to $false.  In the General tab give it a better name, i.e. “CloseApps”.

Try it out.  The execution of the script should now close the same apps you started earlier.

If you are happy with the shortcuts, all you need to do now is fine-tune your text file to add more programs.

If you need a delay after some programs, add DELAY_IN_SECONDS XX where XX are the seconds you need to delay the script at that point of execution.

If you need a program window to be minmized, add /MIN as an argument.

Putting it all together, total automation

If I did not lose you somewhere above and you got everything working, you now get automatically logged in and you have a desktop shortcut to launch everything you need.

Well, we can do better than that! 🙂 We can combine both, and run the script on logon as well. Your decision if this makes sense for you or not.  We can use the Windows Task Scheduler for that. Here is how you do it:

  • Launch the “Task Scheduler”
  • Create a new task and give it a meaningful name, i.e. “LaunchAllApps”. Check run with highest privileges
  • Under Triggers, create a new trigger, chose to be launched “At log on”, select your specific user account and hit OK
  • Under Actions, add a new action to start a program, and then copy and paste the full command line you use for the StartApps shortcut earlier

Here are a couple of screenshots related to the steps above:


If you ever wanted to disable this task, edit its properties/Trigger and uncheck the Enabled.

Blog Post Title

What goes into a blog post? Helpful, industry-specific content that: 1) gives readers a useful takeaway, and 2) shows you’re an industry expert.

Use your company’s blog posts to opine on current industry topics, humanize your company, and show how your products and services can help people.